Milwaukee Toolbox Zen: Finding Peace Through Foam Insert Organisation
Milwaukee Toolbox Zen In the hustle and bustle of our daily lives, finding moments of peace and tranquillity can seem like a distant dream. Yet, amidst the chaos, there exists a concept that holds promise for bringing calm to our workspaces: toolbox zen. Picture this: a neatly organised Milwaukee toolbox, every tool in its place, ready to be effortlessly accessed whenever needed. Let’s explore how foam inserts can help you achieve it.
The Role of Foam Inserts in Achieving Toolbox Zen
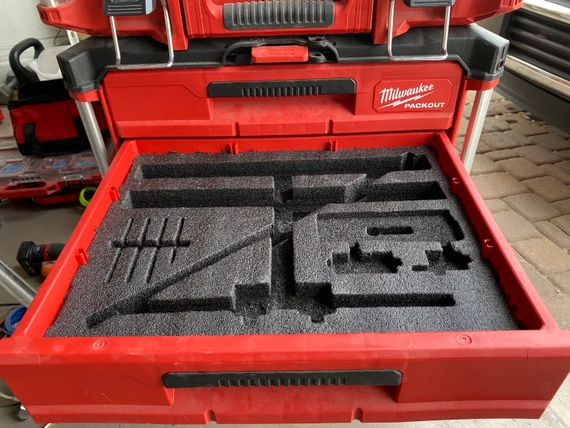
Enter foam inserts—the unsung heroes of toolbox organisation. These simple yet ingenious accessories provide a solution to the age-old problem of tool clutter. By creating custom compartments for each tool, foam inserts make it easy to keep everything in its rightful place. No more rummaging around for that elusive wrench or screwdriver; with foam inserts, everything has its designated spot, contributing to a sense of order and calm in your workspace. To buy your Milwaukee foam inserts, click here.
The Psychology Behind Toolbox Organisation
But what is it about a well-organised toolbox that brings us peace of mind? It all comes down to the psychology of clutter. Research has shown that visual clutter can overwhelm our brains, leading to feelings of anxiety and distraction. On the other hand, a tidy environment has been linked to improved mood and cognitive function. So, by organising our tools with foam inserts, we’re not just tidying up our physical space; we’re also decluttering our minds.
Practical Tips for Creating a Zen Toolbox
Ready to transform your toolbox into a haven of tranquillity? Here are a few practical tips to get you started. First, take inventory of your tools and assess their storage needs. Then, invest in high-quality foam inserts that are durable and customisable. Next, declutter your toolbox by removing any unnecessary items and arranging your tools in a logical manner. Finally, make a habit of regularly maintaining your toolbox to ensure that it remains organised and clutter-free.
Getting Your Milwaukee Foam Inserts Ready to Use
Most people are worried about messing up their Milwaukee foam inserts. They’re concerned they’ll not cut it correctly and have wasted their money. However, the key to success is a little learning and some planning. This guide will take you through what you have to do.
Gather the Necessities
First on the list, get your Milwaukee foam insert. It’s recommended that you purchase a premade size for simplicity. This will slot nicely into your toolbox and save you from cutting it yourself.
To cut the foam, you need a sharp blade. Using a scalpel is easiest, and wearing safety gloves is recommended. A cutting mat should be positioned underneath the foam insert to avoid any damage to the flat surface you’re using.
Create the Layout
A crucial step you shouldn’t skip is planning your foam insert layout. You need to know where all the tools are going, allowing you to use all available space. This can save you money and help you avoid buying more foam inserts. Plus, it ensures your Milwaukee toolbox is organised.
It’s useful to lay out all of the tools on the foam insert, positioning them strategically. Group together any tools, such as spanners and screwdrivers. While you don’t want them to be too close to the edge, ensure there are no large gaps or awkward spaces.
Prepare for the First Cut
Now, it’s time for the fun part: you get to cut the first outline of your tool. Position it back on the foam insert, ensuring you’re happy with where it’s placed. Apply pressure with one hand
and use the scalpel in the other to trace around it. Getting as close to the tool as possible creates a compact design. Note that you can go back around the outline once you’re finished; this is a good way to adjust the depth of the cut.
In addition, carefully consider how deep you want the cut to be. You want it just enough to protect the tool, but not too deep that you can’t get the tool out when you need to use it.
Peel Back the Foam
Once you’re happy with the cut, it’s time to remove the foam. Carefully peel it back, and this will reveal the shape. You can try out the tool in this outline before moving on to the next one. Refer back to your photograph to ensure you’re following the preferred design.
Always ensure you buy quality foam inserts. It’s at this stage where your life is going to be a lot easier. Quality foam will be simple to cut and easier to peel back. It can break away with cheaper foams and not create a solid shape.
Conclusion
Milwaukee Toolbox Zen. Achieving toolbox zen is not just about tidying up your workspace—it’s about creating a sanctuary where you can find peace amidst the chaos of everyday life. And with foam inserts, it’s easier than ever to transform your toolbox into a haven of tranquillity. So why wait?